
Introduction: Transforming Your Bathtub
A worn-out or outdated bathtub can detract from the overall aesthetic appeal of your bathroom. Instead of replacing the entire fixture, refinishing your bathtub can breathe new life into the space, giving it a fresh, modern look without the hassle and expense of a full renovation. In this comprehensive guide, we will explore the step-by-step process of refinishing a bathtub like a professional, allowing you to revitalize your bathroom with minimal time, effort, and cost.

Assessing the Condition of Your Bathtub
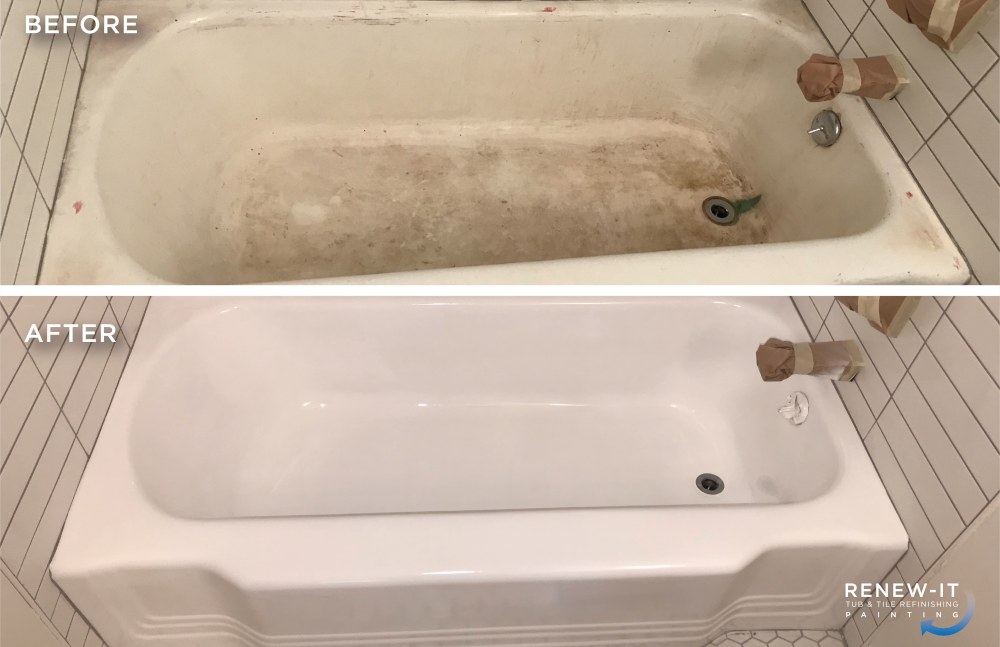
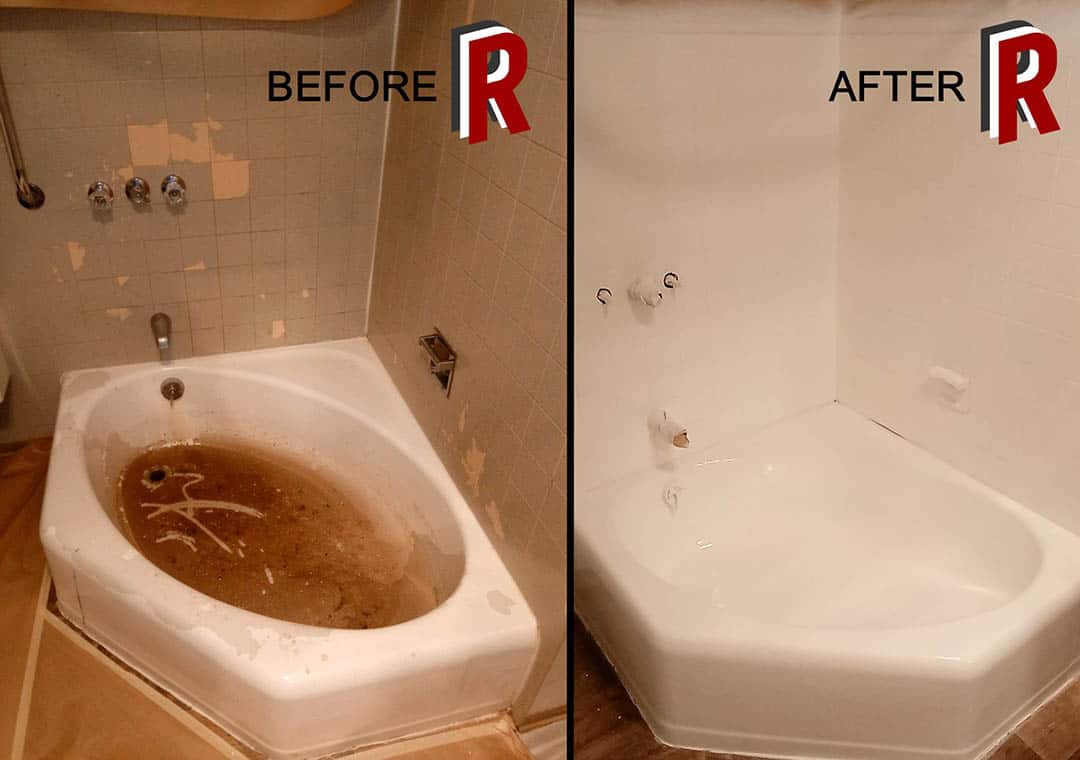
Before embarking on the refinishing process, it’s essential to assess the condition of your bathtub to determine if refinishing is the right option. Look for signs of wear, damage, or surface imperfections such as chips, cracks, stains, or discoloration. Minor cosmetic issues can typically be addressed through refinishing, while structural damage may require professional repairs or replacement.
Gathering the Necessary Supplies and Equipment
Refinishing a bathtub requires specific tools, materials, and equipment to ensure a successful outcome. Before starting the project, gather the following supplies:
- Protective Gear: Safety goggles, gloves, and a respirator mask to protect yourself from fumes and chemical exposure.
- Cleaning Supplies: Mild detergent, scrub brush, and abrasive cleaner for removing dirt, grime, and soap scum from the bathtub surface.
- Sandpaper: Coarse-grit sandpaper (120-220 grit) for roughening the surface of the bathtub.
- Masking Materials: Painter’s tape, plastic sheeting, and drop cloths to protect surrounding surfaces from overspray and drips.
- Epoxy Primer: High-quality epoxy primer specifically formulated for use on bathtubs and tile surfaces.
- Bathtub Refinishing Kit: Two-part epoxy coating kit designed for refinishing bathtubs, available in various colors and finishes.
- Spray Gun or Brush: HVLP spray gun or high-quality brush for applying the epoxy primer and topcoat.
- Ventilation Fan: Box fan or exhaust fan to ventilate the bathroom and remove fumes during the refinishing process.

Maintaining Your Refinished Bathtub
After completing the refinishing process, proper maintenance is crucial to ensure the longevity and durability of your newly refinished bathtub. Here are some additional tips to help you maintain your bathtub’s appearance and performance:
- Regular Cleaning: Make it a habit to clean your refinished bathtub regularly using mild, non-abrasive cleaners. Avoid harsh chemicals or abrasive scrubbing pads, as these can damage the finish over time. Instead, opt for gentle cleaning solutions and soft sponges or cloths to remove dirt, soap scum, and other residues.
- Prompt Repairs: Keep an eye out for any signs of damage or wear on the refinished surface, such as chips, scratches, or discoloration. Address any issues promptly by using touch-up kits or repair products recommended by the bathtub refinishing manufacturer. By addressing minor damage early, you can prevent it from worsening and extend the lifespan of your bathtub’s finish.
- Avoiding Impact: Be mindful of how you use and handle objects in and around the bathtub to prevent accidental damage. Avoid dropping heavy objects or sharp tools onto the surface, as this can cause scratches, chips, or other forms of damage. Use caution when placing or removing items from the bathtub to prevent unnecessary wear and tear.
Preparing the Bathtub Surface
Proper preparation is essential for achieving a durable and long-lasting finish when refinishing a bathtub. Follow these steps to prepare the bathtub surface:
- Clean the Surface: Thoroughly clean the bathtub surface with a mild detergent and scrub brush to remove dirt, soap scum, and oils. Rinse the bathtub with clean water and allow it to dry completely.
- Sand the Surface: Use coarse-grit sandpaper (120-220 grit) to roughen the surface of the bathtub, creating a slightly textured finish that will help the epoxy primer adhere securely.
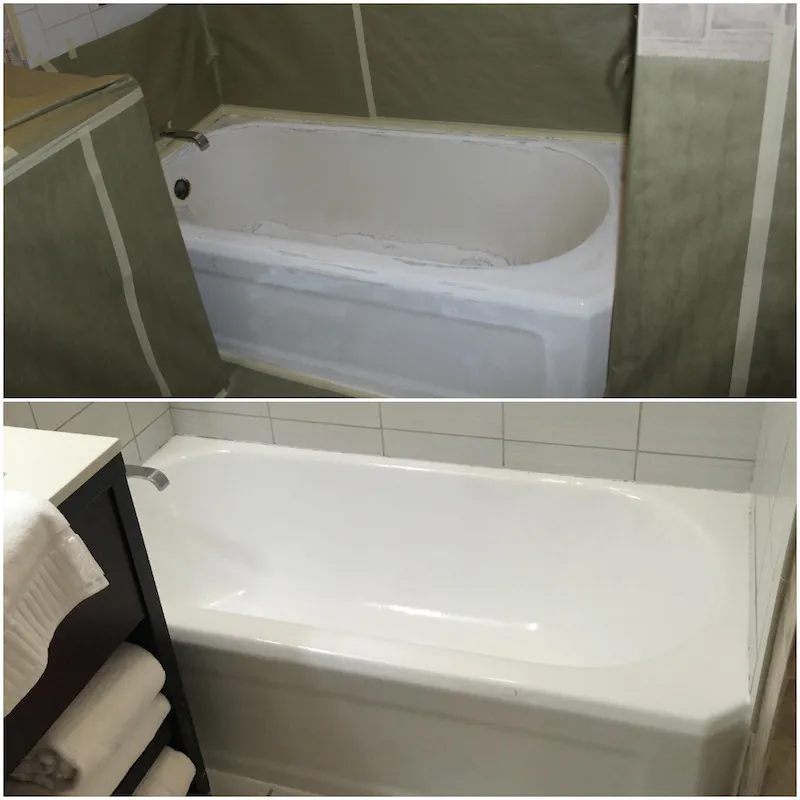
- Mask Off Surrounding Surfaces: Use painter’s tape and plastic sheeting to mask off surrounding surfaces such as walls, fixtures, and countertops to protect them from overspray and drips during the refinishing process.
- Repair Any Damage: Fill any chips, cracks, or holes in the bathtub surface with epoxy filler or acrylic repair compound. Smooth the repaired areas with sandpaper once the filler has dried completely.
Applying the Epoxy Primer and Topcoat
Once the bathtub surface is properly prepared, it’s time to apply the epoxy primer and topcoat. Follow these steps for a professional-quality finish:
- Apply the Epoxy Primer: Mix the epoxy primer according to the manufacturer’s instructions, and pour it into a spray gun or paint tray. Apply the primer evenly to the bathtub surface using smooth, overlapping strokes, ensuring full coverage. Allow the primer to dry according to the manufacturer’s recommended drying time.
- Sand Between Coats: After the primer has dried, lightly sand the surface with fine-grit sandpaper (220-320 grit) to smooth out any rough spots or imperfections. Wipe away any dust with a clean, damp cloth before applying the topcoat.
- Apply the Topcoat: Mix the two-part epoxy topcoat according to the manufacturer’s instructions, and pour it into the spray gun or paint tray. Apply the topcoat evenly to the bathtub surface, using the same technique as with the primer. Allow the topcoat to dry thoroughly between coats, applying additional coats as needed to achieve the desired finish.
- Cure the Finish: After applying the final coat of topcoat, allow the bathtub surface to cure fully according to the manufacturer’s instructions. This typically involves allowing the finish to dry for at least 24 to 48 hours before using the bathtub.
Finishing Touches and Maintenance
Once the bathtub refinishing process is complete, remove the masking materials and clean up any overspray or drips. To maintain the newly refinished surface and extend its lifespan, follow these maintenance tips:
- Avoid Abrasive Cleaners: Use mild, non-abrasive cleaners and soft sponges or cloths to clean the bathtub surface. Avoid harsh chemicals, abrasive cleaners, and scrubbing pads, as these can damage the finish.
- Prevent Scratches and Chips: Avoid dropping heavy objects or sharp tools onto the bathtub surface, as this can cause scratches, chips, or other damage to the finish. Use caution when handling abrasive materials or cleaning tools near the bathtub.
- Repair Minor Damage Promptly: Address any minor damage or surface imperfections promptly to prevent further deterioration. Use touch-up kits or repair products recommended by the bathtub refinishing manufacturer to fix small chips or scratches.
- Maintain Proper Ventilation: Ensure adequate ventilation in the bathroom to prevent moisture buildup and minimize the risk of mold or mildew growth. Use a ventilation fan or open windows during and after bathing to allow moisture to escape.
Conclusion: Achieving Professional Results
In conclusion, refinishing a bathtub is a cost-effective and efficient way to revitalize your bathroom and give it a fresh, modern look. By following the step-by-step process outlined in this guide and using high-quality materials and equipment, you can achieve professional results and enjoy a beautifully refinished bathtub that enhances the overall aesthetic appeal of your space. With proper preparation, application, and maintenance, your refinished bathtub can provide years of durable and long-lasting performance, allowing you to enjoy a rejuvenated bathroom for years to come.