
Introduction: The Promise of Restoration
The once-luxurious bathtub, a sanctuary where one could escape the world’s hustle and bustle, now stands as a testament to time’s unyielding passage. Cracks mar its surface, not only spoiling its aesthetic appeal but also threatening its functionality. Fear not, for hope shines through the fractures—cracked bathtub repair offers a pathway to restoration, breathing new life into your cherished sanctuary. This comprehensive guide delves into the intricate process, equipping you with knowledge and practical steps to transform your tub from worn-out to wonderful.
Understanding the Importance of Prompt Repair
Cracks in bathtubs are more than just unsightly blemishes; they’re gateways to more severe issues. Moisture seeping through these cracks fosters an environment ripe for mold and mildew growth, posing health hazards to inhabitants. Additionally, unchecked leaks can damage underlying structures, leading to costly repairs down the line. Prompt action not only preserves the bathtub’s integrity but also safeguards your home’s overall well-being and your family’s health.
Assessing the Damage: A Methodical Approach
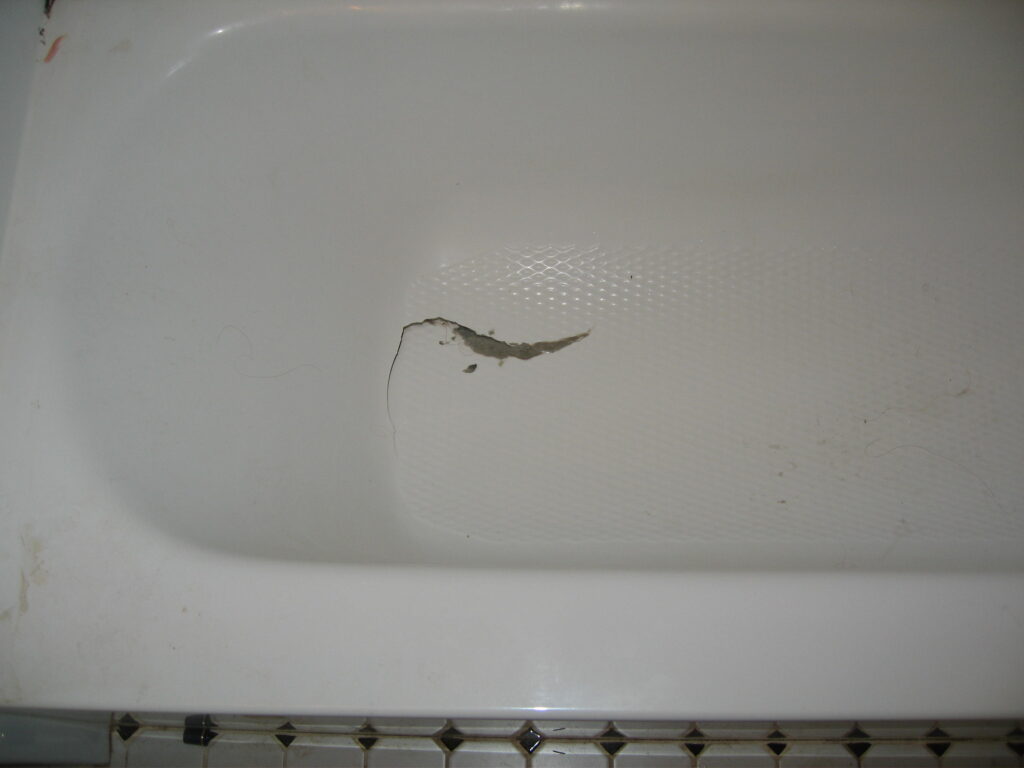
Before embarking on any repair journey, thorough assessment is paramount. Begin by identifying the type of crack—hairline, spiderweb, or more substantial—and determine its cause. Was it due to impact, age-related wear, or perhaps a foundational shift? Understanding the crack’s nature helps select the appropriate repair method. Moreover, inspect for any signs of underlying damage such as rust or rot, which may necessitate additional repairs before addressing the superficial crack.
Choosing the Right Repair Method: DIY vs. Professional Services
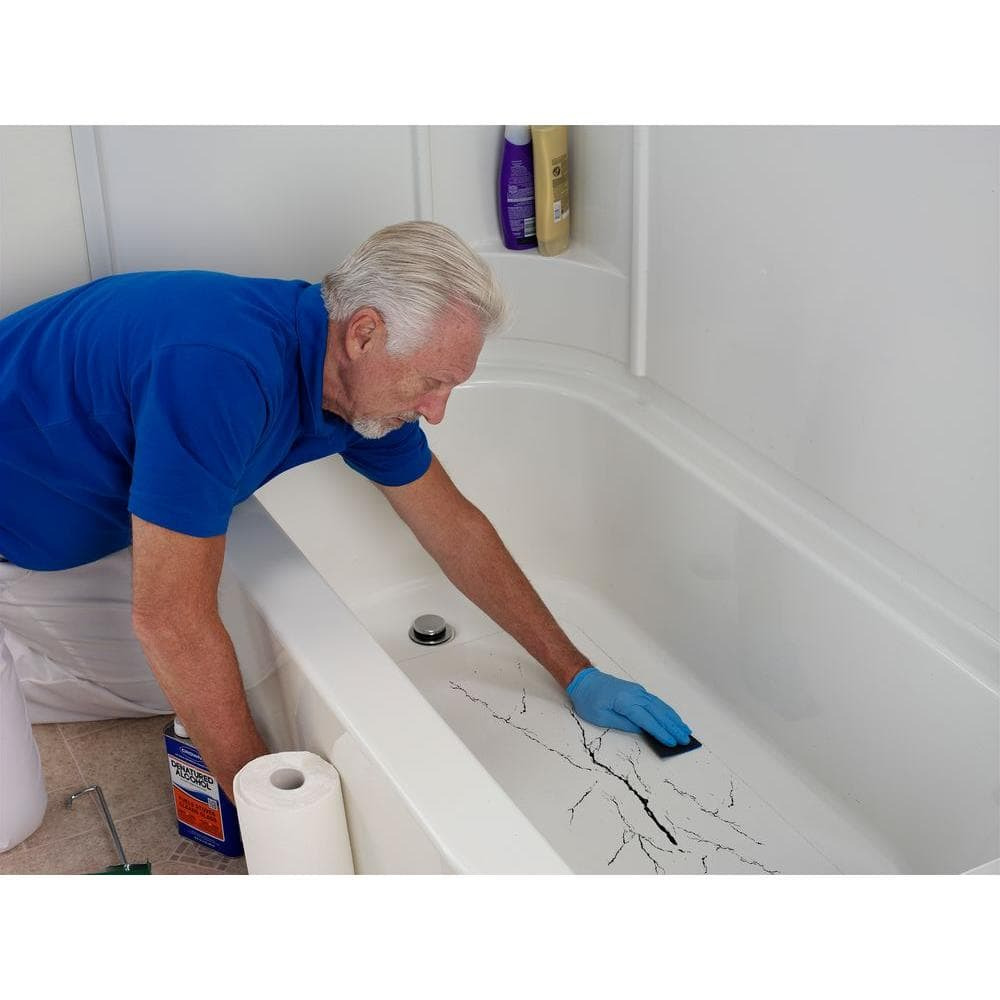
Repair options abound, ranging from DIY kits for minor cracks to professional interventions for more complex damages. DIY enthusiasts with hairline cracks can opt for epoxy or polyester resin fillers, following package instructions meticulously. However, for larger cracks, deep chips, or structural issues, professional help is advisable. Experts possess specialized tools and materials, ensuring a seamless, long-lasting fix. Consider factors like your DIY proficiency, the extent of damage, and the value of a professional finish when making this decision.
Preparing for Repair: Essential Steps
Regardless of the chosen repair route, preparation is key. Clear the area around the bathtub, removing all toiletries and cleaning the surface thoroughly. For best results, use a mild detergent followed by a rinse with clean water and allow it to dry completely. Mask off any surrounding surfaces to prevent accidental damage during the repair process. Furthermore, ensure proper ventilation to minimize exposure to fumes, especially when working with chemical compounds.
Executing the Repair: A Step-by-Step Guide
When repairing with a DIY kit, begin by mixing the filler according to package instructions. Apply it carefully into the crack, using a putty knife or specialized applicator to smooth it flush with the tub’s surface. Allow it to cure fully before sanding down any excess material for a smooth finish. For professional repairs, the process might involve more extensive steps such as removing damaged sections, applying patching compounds, and refinishing the entire tub surface for uniformity.
Post-Repair Finishing Touches: Restoring Aesthetics
Once the repair is structurally sound, attention turns to aesthetics. If the repair area is noticeable due to color mismatch, consider refinishing the entire bathtub. Refinishing involves applying a specialized coating that can restore the tub’s original shine or even alter its color for a fresh look. This process typically requires professional services to ensure an even, durable finish resistant to chipping and fading.
Preventive Measures: Safeguarding Your Investment
To prolong the lifespan of your newly repaired bathtub, adopt preventive measures. Regular cleaning with gentle products and avoiding abrasive scrubbers can go a long way in maintaining the surface integrity. Also, be mindful of heavy objects that could potentially cause impact damage. Installing non-slip mats or using a bath caddy can prevent accidental drops that might lead to cracks.

Understanding the Cost Implications
The cost of bathtub repair varies significantly depending on the extent of damage, materials used, and whether you choose DIY or professional services. Simple DIY repairs can cost as little as $50 for a repair kit, while professional repairs for extensive damage can escalate into the thousands, including labor and materials. It’s crucial to obtain multiple quotes and weigh the long-term benefits against upfront costs.
Enhancing Longevity through Proper Maintenance
Regular maintenance is key to ensuring your bathtub remains in top condition post-repair. Here are some additional tips to safeguard your investment:
- Seal Grout and Caulking: Over time, grout and caulking around the edges of your bathtub can deteriorate, allowing water seepage that can damage underlying structures. Inspect these areas periodically and reseal them when necessary to prevent water damage and mold growth.
- Use a Bathtub Mat: While non-slip mats inside the tub provide traction, consider placing a soft, absorbent mat outside the tub to catch dripping water. This helps keep the floor dry and reduces slipping hazards, plus it protects the bathtub’s surface from scratches caused by accidental contact with hard objects.
- Manage Water Chemistry: If you have a bathtub made of materials like acrylic or fiberglass, be cautious with harsh chemicals. Certain cleaning products or even heavily chlorinated water can damage the surface over time. Use mild, pH-neutral cleaners specifically designed for bathtubs to maintain their finish.
- Tackle Stains Promptly: Address stains as soon as they appear. Different stains require different treatments – for example, mildew can be treated with a bleach solution, while hard water stains may respond better to vinegar or a specialized cleaner. Prompt action prevents stains from setting in and potentially damaging the surface.
- Temperature Control: Sudden temperature changes, like pouring boiling water into a cold bathtub, can stress materials like acrylic and cause cracking. Gradually adjust water temperatures to avoid such shocks.
- Inspect Plumbing Regularly: Hidden leaks from faucets or drains can slowly corrode or weaken the bathtub’s structure. Periodic checks of plumbing connections and prompt repairs of any leaks can prevent more extensive (and costly) damage.
- Ventilation Matters: Adequate bathroom ventilation helps reduce humidity and prevent mold growth, which can not only damage your bathtub but also pose health risks. Ensure your bathroom has a functional exhaust fan and use it during and after baths or showers.

Conclusion: Embracing Renewal
A cracked bathtub needn’t be a cause for despair. With careful assessment, the right repair approach, and diligent aftercare, your bathtub can regain its former glory, becoming a source of relaxation and pride once more. Whether opting for a DIY solution or enlisting professional expertise, remember that restoration is an investment in both the functionality and aesthetic appeal of your home. Embrace the journey towards renewal, transforming a symbol of wear into a testament to rejuvenation.