
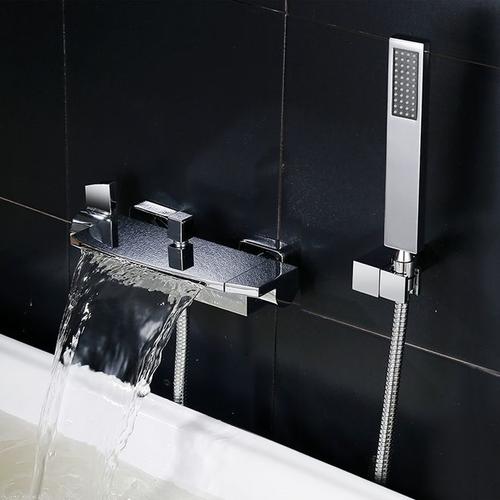
Introduction
Updating your bathroom’s fixtures can instantly refresh the space and give it a whole new look. One of the most impactful changes you can make is replacing the bathtub faucet. Whether you’re looking to upgrade to a more modern style or simply need to fix a leaky faucet, changing a bathtub faucet is a relatively straightforward DIY project. In this guide, we’ll provide a step-by-step walkthrough to help you tackle this project with confidence and achieve professional-looking results.

Assessing the Situation
Before diving into the faucet replacement process, it’s essential to assess the condition of your current bathtub faucet and determine the type of replacement you’ll need. Inspect the faucet for any signs of wear, corrosion, or leaks. Determine whether you’ll be replacing the entire faucet assembly or just specific components such as the handles, spout, or cartridge. Take measurements of the existing faucet to ensure compatibility with the new replacement parts. Additionally, gather the necessary tools and materials you’ll need for the project, including a new bathtub faucet assembly, plumber’s tape, an adjustable wrench, screwdrivers, and a utility knife.
Shutting Off the Water Supply
Before beginning any work on the bathtub faucet, it’s crucial to shut off the water supply to prevent any leaks or flooding. Locate the shut-off valves for the hot and cold water lines leading to the bathtub. These valves are typically located in the wall or underneath the sink. Turn the valves clockwise to shut off the water flow completely. Once the water supply is turned off, turn on the bathtub faucet to drain any remaining water from the pipes and relieve any pressure in the system.

Removing the Old Faucet
With the water supply shut off, you can now begin removing the old bathtub faucet. Start by removing any decorative caps or covers on the faucet handles to access the screws or mounting hardware underneath. Use a screwdriver or an Allen wrench to loosen and remove the screws or bolts securing the handles to the faucet stems. Once the handles are removed, use an adjustable wrench to loosen and disconnect the nuts or fittings securing the faucet assembly to the bathtub. Carefully pull the old faucet assembly away from the bathtub, taking care not to damage the surrounding tiles or wall.
Preparing the New Faucet Assembly
Before installing the new bathtub faucet, take some time to prepare the components and ensure everything is ready for installation. Remove any packaging or protective covers from the new faucet assembly. Inspect the components for any defects or damage and confirm that all necessary parts are included. Apply plumber’s tape to the threads of the faucet stems to create a watertight seal and prevent leaks. Additionally, familiarize yourself with the manufacturer’s instructions and assembly diagrams to ensure proper installation.

Installing the New Faucet Assembly
With the old faucet removed and the new assembly prepared, it’s time to install the new bathtub faucet. Begin by positioning the new faucet assembly in the desired location on the bathtub. Slide the faucet stems through the pre-drilled holes in the bathtub, ensuring a snug fit. Secure the faucet assembly in place by tightening the nuts or fittings underneath the bathtub with an adjustable wrench. Be careful not to over-tighten the fittings, as this could damage the faucet or bathtub.
Attaching the Handles and Trim
Once the new faucet assembly is securely installed, it’s time to attach the handles and trim pieces. Align the handles with the faucet stems and insert the screws or bolts provided with the new faucet assembly. Use a screwdriver or Allen wrench to tighten the screws or bolts securely, ensuring that the handles are firmly attaching to the stems. If the new faucet assembly includes trim pieces such as a spout or escutcheon plate, follow the manufacturer’s instructions to install these components properly.
Testing and Adjustments
With the new bathtub faucet installed and assembled, it’s time to test the water flow and check for any leaks or issues. Turn the water supply back on by rotating the shut-off valves counterclockwise. Slowly turn on the bathtub faucet and check for any leaks around the handles, spout, or connections. If you notice any leaks, tighten the fittings or connections as needed to create a watertight seal. Once you’re satisfied with the installation and there are no leaks, test the hot and cold water flow to ensure proper operation.

Finishing Touches
With the new bathtub faucet successfully installed and tested, it’s time to add the finishing touches to complete the project. Clean any debris or excess plumber’s tape from around the faucet assembly and bathtub surface. Apply a bead of waterproof caulk around the base of the faucet assembly to seal any gaps and prevent water from seeping underneath. Reattach any decorative caps or covers to the faucet handles to give the installation a polished appearance. Finally, step back and admire your handiwork, enjoying the refreshed look and improved functionality of your updated bathtub faucet.
Addressing Plumbing Issues
While replacing a bathtub faucet is generally a straightforward DIY project, it’s essential to be prepared for any unexpected plumbing issues that may arise during the installation process. For example, you may encounter corroded or rusted pipes, damaged fittings, or outdated plumbing connections that need to be addressed before installing the new faucet. If you’re unsure about the condition of your plumbing or lack the necessary skills to tackle complex issues, it’s best to consult a professional plumber for assistance. They can assess the situation, make any necessary repairs or upgrades, and ensure that your new faucet install safely and securely.
Upgrading to Water-Saving Features
As you select a new bathtub faucet, consider upgrading to models with water-saving features to conserve water and reduce your household’s environmental footprint. Many modern faucets design with built-in aerators or flow restrictors that regulate water flow and reduce water consumption without sacrificing performance. Look for faucets with the WaterSense label, which indicates that they meet the Environmental Protection Agency’s (EPA) criteria for water efficiency and performance. By choosing a water-saving faucet, you can enjoy the benefits of lower water bills and contribute to water conservation efforts in your community.
Adding Smart Technology
For added convenience and functionality, consider incorporating smart technology into your new bathtub faucet. Smart faucets are equip with sensors or touchless controls that allow you to turn the water on and off with a wave of your hand or a voice command. Some models even feature customizable presets for water temperature and flow rate, so you can enjoy a personalized bathing experience every time. Additionally, smart faucets can provide real-time water usage data and alerts to help you monitor your water consumption and identify potential leaks or issues. While smart faucets may come with a higher price tag, their advanced features and energy-saving benefits make them a worthwhile investment for many homeowners.
Conclusion
Replacing a bathtub faucet is a rewarding DIY project that can instantly transform the look and feel of your bathroom. By following this step-by-step guide and taking the time to assess the situation, shut off the water supply, remove the old faucet, prepare the new assembly, install the new faucet, attach the handles and trim, test and make adjustments, and add the finishing touches, you can achieve professional-looking results and enjoy a refreshed bathroom space. With a little time, effort, and attention to detail, you can unleash your DIY skills and give your bathroom a facelift with a new bathtub faucet.